Adding a course timetable in the ERP system for St. Xavier’s College Jaipur is an essential task for managing course schedules efficiently. Follow the steps below to add a course timetable:
Step 1: Log in to the ERP
Access the ERP system using the appropriate URL based on your network:
- On local college WiFi or LAN: http://erp.local/site/login
- On the internet: https://erp.sxcjpr.edu.in/site/login
Enter your credentials and click on the “Login” button.
Step 2: Navigate to the Course Management Section
- After logging in, locate the main menu on the dashboard.
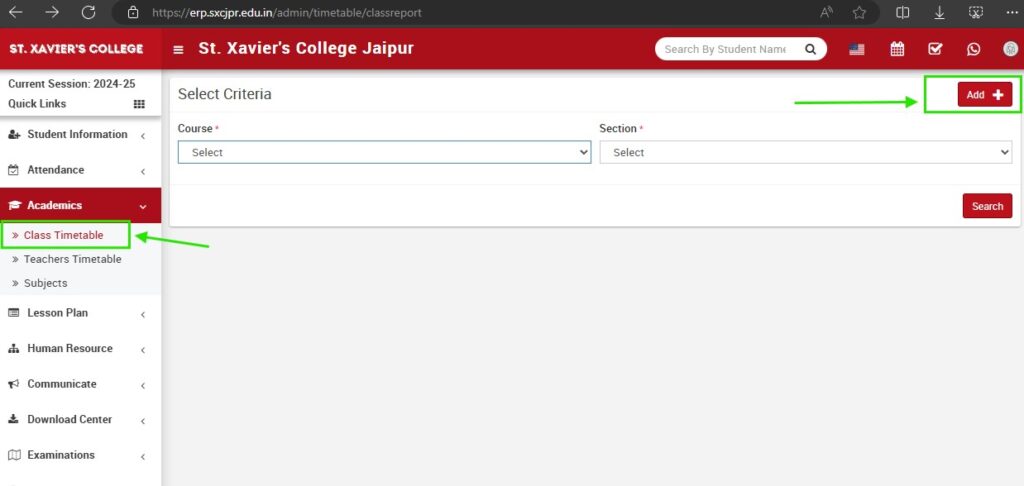
- Click on the “Academics” option.
- In the dropdown menu, select “Class Timetable.”
Step 3: Select Course and Section
- On the Class Timetable page, use the dropdown menus to select the appropriate course and section.
- Click on the “Add” button.
Step 4: Add Timetable Details
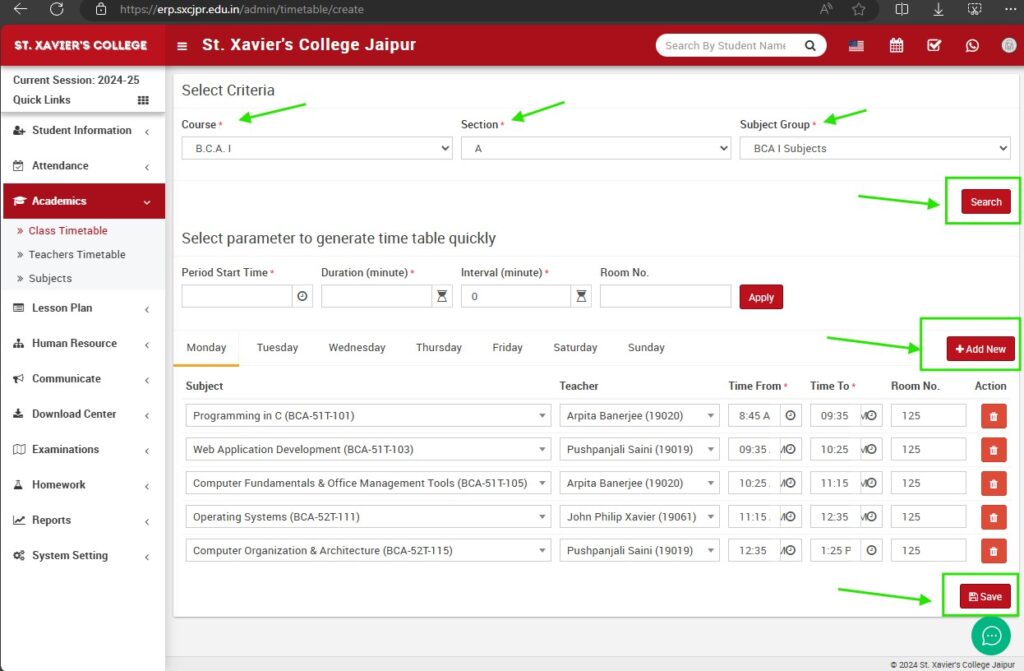
- After selecting the course and section, you will see a form where you need to enter the timetable details.
- Select the subject group.
- Click on the “Search” button to load the subjects.
Step 5: Enter Timetable Parameters
- Enter the period start time, duration, interval, and room number.
- For each day of the week, select the subject, teacher, time from, time to, and room number.
Step 6: Add New Entry
- Click on the “Add New” button to add each timetable entry.
Step 7: Save the Timetable
- After entering all the required details, click on the “Save” button.
Step 8: Verify the Timetable
- Return to the Class Timetable page to verify the newly added timetable.
- Ensure that the timetable details are correct and appear as expected.
Additional Tips
- Editing an Existing Timetable: If you need to make changes to an existing timetable, select the course, locate the timetable entry, and click on the “Edit” button. Make the necessary changes and save.
- Deleting a Timetable Entry: To delete a timetable entry, select the course, locate the timetable entry, and click on the “Delete” button. Confirm the deletion when prompted.


